Creating an Entitlement
An Entitlement is a customer order.
This section includes:
>Creating a Sentinel LDK Entitlement
>Managing Entitlements on Sentinel Keys
When you modify a provisioning container, you are actually creating a replacement Entitlement. For details, see Modifying a Provisioning Container.
Creating a Sentinel LDK Entitlement
When you create an LDK Entitlement, you can:
> Specify the Products for which you want to create the Entitlement.
>Edit the license terms for individual Features.
>Edit the content and layout of the memory data stored in Sentinel protection keys.
To create a Sentinel LDK Entitlement:
1.Open the Create New Entitlement page![]() Show me how
Show me how
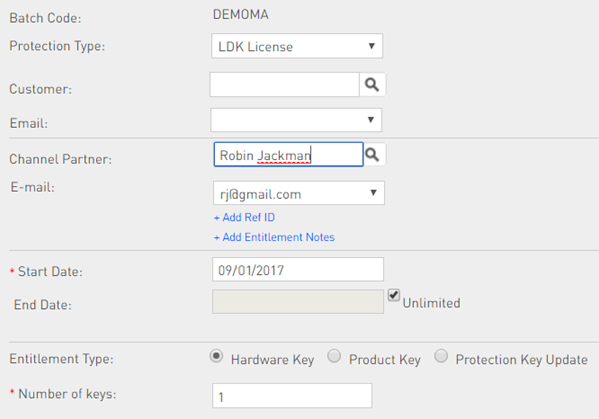
2.In the Protection Type box, select LDK License.
3.(Optional) Specify a customer:
a.In the Customer box, specify the Customer for which you are creating the Entitlement.
–Enter the first few characters of the Customer name (alphanumeric) or the Customer ID (numeric). A list of matching Customers is displayed. Select a name from the list or click <<ADD NEW>> to create a new customer.
If the list displays multiple customers with the same name, select one. In the dialog box that opens, select the relevant customer and click OK.
–Click  to perform an advanced search.
NOTE In the following situations, you can select only associated channel partners for the Entitlement:
>Only the DEMOMA batch code is present in the EMS database.
>A batch code other than DEMOMA is present in the EMS database, the master key is connected, and the Channel Partner module is available in the master key.
Similarly, if you select a channel partner, only associated customers are available.
b.Select an e-mail address from the E-mail list, or leave this box blank.
4.(Optional) In the Channel Partner box, type the first few characters of the channel partner name. A list of matching names is populated. Select a name from the list or click <<ADD NEW>> to create a new channel partner. To perform an advanced search, click  .
.
NOTE
>If you specified a customer, only the associated channel partners are available if the EMS database contains:
•Only the DEMOMA batch code, or
•A batch code other than DEMOMA when the master key is connected and an unexpired Channel Partner module exists in the master key.
>When you create a channel partner, you associate products with channel partners. When you specify a channel partner in an Entitlement, only products associated with that channel partner are available for that entitlement. For details, see Creating a Channel Partner.
5.If the Channel Partner has multiple contact e-mail IDs, you can select one from the E-mail list.
6.(Optional) Click the Add Ref ID link to add reference IDs. In the Ref ID 1 and Ref ID 2 boxes, enter something that identifies the Entitlement in another system, such as, the order code in your company's ERP system.
7.(Optional) Click the Add Entitlement Notes link to add a description to the Product. In Comments, enter text to provide additional information about the Product. (Maximum: 510 characters)
8.Enter the Start Date and End Date for the Entitlement. You can activate an entitlement at any time from the start date, up to and including the end date. To extend the end date indefinitely, select the Unlimited check box.
9.In the Entitlement Type box, specify one of the following:
•Hardware Key: Writes the Entitlement items to one or more Sentinel HL keys.
•Product Key: Associates the Entitlement items to one or more Product Keys.
•Protection Key Update: Enables changes to be made to the license data stored in deployed keys.
10.Select the Products to include in the Entitlement:
a.Do the following:
| Click: | To: |
|---|---|
| Add Product |
Add a Product to the Entitlement. Only products associated with the specified channel partner can be included in the Entitlement unless one of the following conditions is true: >The master key is not connected, and the EMS database contains multiple batch codes. >The master key is connected, and the Channel Partner module is expired or is not present in the master key. In these cases, all products are displayed. |
| Add Products From State |
Copy the Product details from a previous C2V file or Key ID to the Entitlement. This button is available only if the administrator selected the Allow adding Products from State check box in the Administrator Console. For details, see the Sentinel LDK—EMS Configuration Guide. |
The Product Selection dialog box opens.
b.Select one or more Products. Each Product must be compatible with the Entitlement type. For example, you cannot add a Product to an Entitlement for Sentinel SL keys if that Product must be locked to a Sentinel HL key. For details, see Adding Products to an Entitlement.
c.Click Add Product to Entitlement. The selected Products are added to the Entitlement.
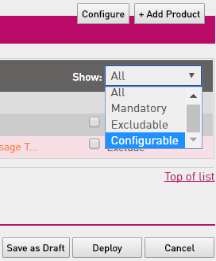
11.(Optional) In the Show column, select which Product Features are displayed. (By default, only the Features for which license terms need to be defined are displayed.)
•All: Displays all Features.
•Mandatory: Displays only mandatory Features that are always included.
•Excludable or Includable: Displays only the Features that were specified as Can be excluded when the Product was created. (The administrator defines whether Features are displayed as excludable or includable in the Administrator Console.)
•Configurable: Displays only the Features with undefined license terms (in orange). After the values are defined, the License Terms are shown in green.
12.In the Rehost column, select a value for Product rehosting if not already defined:
•Enable—Enables Product rehosting.
•Disable—Disables Product rehosting.
•Leave as it is—Retains the rehost value defined in the Protection Key.
13.Exclude or include Features that are not defined as always included.
| To: | Do this: |
|---|---|
| Exclude a Feature from the Product | Either select the Exclude check box or clear the Include check box, depending on the displayed settings. |
| Include a Feature in the Product | Either clear the Exclude check box or select the Include check box, depending on the displayed settings. |
14.Select a Product and click Memory to edit memory data, if not already defined. For details, see Editing Memory Data During Entitlement Generation.
15.Configure the license terms, if not already defined. For details, see Defining License Terms for a Sentinel LDK Product.
•To configure the license terms for a single feature, click Configure.
•To configure the license terms for multiple features simultaneously, select the relevant check boxes and click Configure Selected.
NOTE You can produce the Entitlement or add the Entitlement to the production queue only after the license terms are defined for all of the Features in every Product in the Entitlement.
16.Do one of the following with the Entitlement:
•Save as Draft—Save the Entitlement in Draft state until it is ready to be added to the production queue.
•Queue—Add the Entitlement to the queue to make it available for production.
•Produce—Produce the Entitlement immediately.
Managing Entitlements on Sentinel Keys
You can create an Entitlement from a Sentinel key, and you can transfer a license from an existing Sentinel key to a new key.
You can create an Entitlement from the current state of a Sentinel Key using a C2V file or Key ID. This results in a new key that is identical to the old key. For example, if a Product in the key was defined to expire after 100 days, and the user has already used the key for 40 days, then the Product in the new key will expire in 60 days. This feature is useful, for example:
>If the customer's machine is corrupted and the V2C file is not available
>If the customer's Sentinel HL key is damaged or lost, or its battery is weak or depleted
When you create an Entitlement from the current state of a Sentinel Key using a C2V file or Key ID:
>You cannot add or remove Products in the list of Products drawn from the previous key.
>You cannot change license terms.
>You cannot edit memory data or view memory segments of individual Products. When you click the Memory tab, the consolidated view of memory segments of all Products is displayed. To get an idea of individual memory segments, you can use the Map button in the Memory Segment window.
NOTE This feature is available only if your Sentinel EMS administrator has enabled the Allow adding Products from State option in the Administrator Console. If this option is selected, you will see Add Product From State button in the Product Details pane. This button enables you to add Product details from a previous C2V file or Key ID.
To create an Entitlement using a C2V file or Key ID:
1.Open the Create New Entitlement page![]() Show me how
Show me how
2.In Protection Type, select LDK License.
3.(Optional) Specify a customer:
a.In the Customer box, specify the Customer for which you are creating the Entitlement.
–Enter the first few characters of the Customer name (alphanumeric) or the Customer ID (numeric). A list of matching Customers is displayed. Select a name from the list or click <<ADD NEW>> to create a new customer.
If the list displays multiple customers with the same name, select one. In the dialog box that opens, select the relevant customer and click OK.
–Click to perform an advanced search.
b.Select an e-mail ID from the E-mail list, or leave this box blank.
4.(Optional) To specify a Channel Partner, click the Add Channel Partner link. The Channel Partner box is displayed. Type the first few characters of the Channel Partner name. A list of matching names is populated. Select a name from the list. To perform an advanced search, click .
If the Channel Partner has multiple contact e-mail IDs, you can choose one from the E-mail box.
5.(Optional) Click the Add Ref ID link to add reference IDs. In the Ref ID 1 and Ref ID 2 boxes, enter something that identifies the Entitlement in another system, such as, the order code in your company's ERP system.
6.(Optional) Click the Add Entitlement Notes link to add a description to the Product. In Comments, enter text to provide additional information about the Product. (Maximum: 510 characters)
7.Enter the Start Date and End Date for the Entitlement. You can activate an entitlement at any time from the start date, up to and including the end date. To extend the end date indefinitely, select the Unlimited check box.
8.In the Entitlement Type box, specify one of the following:
•Product Key: Associates the Entitlement items to one or more Product Keys.
•Hardware Key: Writes the Entitlement items to one or more Sentinel HL keys.
•Protection Key Update: Enables changes to be made to the license data stored in deployed keys.
9.In the Product Details pane, click Add Product From State. The Add Product From State dialog box opens.
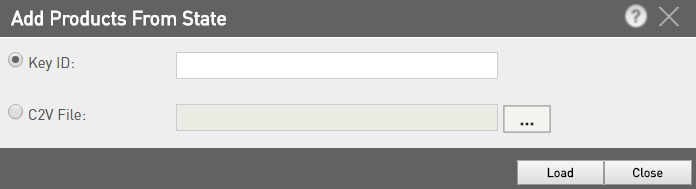
10. In this dialog box, do one of the following:
•Select Key ID and enter the Key ID.
•Select C2V File and click  to browse and select the C2V file.
11.Click Load. All Products available in the previous Entitlement (related to the C2V file or Key ID) are listed in the Product Details pane.
12.You cannot edit the memory data. However you can see a consolidated view of memory segments of all Products in the Entitlement by clicking the Memory tab. You can use the Map button in the Memory Segment window to view individual memory segments.
13.Do one of the following with the Entitlement:
•Save as Draft: Save the Entitlement in Draft state until it is ready to be added to the production queue.
•Queue: Make the Entitlement available for production.
•Produce: Produce the Entitlement immediately.
Creating a Cloud Entitlement
When you create a Cloud Entitlement, you can:
> Specify the Products for which you want to create the Entitlement.
>Edit the license terms for individual Features.
To create a Cloud Entitlement:
1.Open the Create New Entitlement page![]() Show me how
Show me how
2.From the Protection Type drop-down list, select Cloud License.
NOTE The Sentinel LDK License option is displayed as default. The Cloud License option is available only when your Batch Code is cloud enabled.
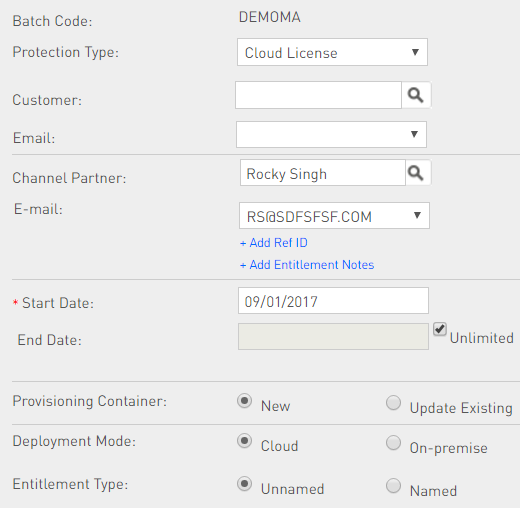
3.(Optional) In the Customer box, specify the Customer for which you are creating the Entitlement.
–Enter the first few characters of the Customer name (alphanumeric) or the Customer ID (numeric). A list of matching Customers is displayed. Select a name from the list or click <<ADD NEW>> to create a new customer.
If the list displays multiple customers with the same name, select one. In the dialog box that opens, select the relevant customer and click OK.
–Click to perform an advanced search.
You can leave this box blank if you want to save the Entitlement as a Draft. If you intend to deploy the Entitlement, you must:
•Specify a Customer.
• Make sure that the specified customer has at least one contact e-mail.
4. If the Customer has multiple contact e-mail IDs, select one from the E-mail list.
5.(Optional) In the Channel Partner box, type the first few characters of the channel partner name. A list of matching names is populated. Select a name from the list or click <<ADD NEW>> to create a new channel partner. To perform an advanced search, click .
NOTE On the Creating a Channel Partner page, you associate products with channel partners. When you specify a channel partner here, only products associated with that channel partner are available for the entitlement.
6.If the Channel Partner has multiple contact e-mail IDs, you can choose one from the E-mail box.
7.(Optional) Click the Add Ref ID link to add reference IDs. In the Ref ID 1 and Ref ID 2 boxes, enter something that identifies the Entitlement in another system, such as, the order code in your company's ERP system.
8.(Optional) Click the Add Entitlement Notes link to add a description to the Product. In Comments, enter text to provide additional information about the Product. (Maximum: 510 characters)
9.In the Provisioning Container box, select New to create a new Provisioning Container ID for the Entitlement.
NOTE The Update Existing option is used to modify an existing Cloud Entitlement. For details, see Creating an Entitlement.
10.In the Deployment Mode box, specify whether your protected application will be hosted on the cloud or installed locally. For details, see Defining Deployment Mode and Other Details.
11.To select the product(s) to be included in the entitlement, click Add Product.
NOTE
When you click Add Product, products related to the channel partner are displayed so that they can be included in the entitlement. However, if either of the following conditions is true, product filtering will fail and all products will be displayed.
>The master key is unplugged and multiple batch codes are present in the EMS database.
>The master key is connected and either feature 12 license has expired or the channel partner module is not present in the master key.
12.In the Product Selection dialog box, select one or more products.
13. Click Add Product to Entitlement. The selected Products are added to the Entitlement and displayed in the Product Details pane.
14.(Optional) In the Show column, select which Product Features are displayed. (By default, only the Features for which license terms need to be defined are displayed.)
•All: Displays all Features.
•Mandatory: Displays only mandatory Features that are always included.
•Excludable or Includable: Displays only the Features that were specified as Can be excluded when the Product was created. (The administrator defines whether Features are displayed as excludable or includable in the Administrator Console.)
•Configurable: Displays only the Features with undefined license terms (in orange). After the values are defined, the License Terms are shown in green.
15.Configure the license terms, if not already defined. For details, see Defining License Terms for a Cloud Product.
•To configure the license terms for a single feature, click Configure.
•To configure the license terms for multiple features simultaneously, select the relevant check boxes and click Configure Selected.
NOTE You can deploy the Entitlement only after the license terms are defined for all the Features in all the Products included in the Entitlement.
16.To finalize the entitlement, click one of the following buttons:
•Save as Draft: Saves the Entitlement in Draft state until it is ready to be deployed.
•Deploy: The Entitlement is deployed to the Sentinel Cloud Connect server.
If the Sentinel Cloud Connect server is temporarily unreachable, you can save the Entitlement as a draft and deploy it later.
After the Entitlement is deployed, the new Entitlement is displayed as the first item in the Entitlements list. A corresponding Provisioning Container with a unique Provisioning Container ID (PC ID) is created for the Entitlement.
You can click the PC ID link in the Entitlement Details pane to view the PC ID details. For details, see Managing Provisioning Containers.