Modifying a Provisioning Container
When you modify a Provisioning Container, you in fact create a new Entitlement with parameters copied from an existing Entitlement currently linked with the Provisioning Container. After the new Entitlement is deployed, it becomes the current Entitlement for the Provisioning Container. All previous Entitlements are maintained in the transaction history of the Provisioning Container.
When you modify a Provisioning Container, you can:
>Add a new Product or remove an existing Product.
>Exclude or include Features in the Products
>Modify the license model attributes such as Execution Count, Time, and Grace
>Modify the number of Identities
>Modify the Station Count
>Modify Max Registration Count
>Allow or deny customers to manage fingerprints and active stations
To modify a Provisioning Container:
1.Open the Create New Entitlement page![]() Show me how
Show me how
2.In Protection Type, select Cloud License.
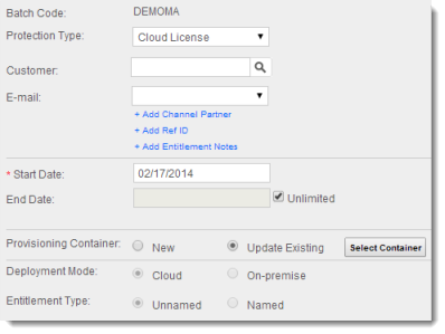
3.In Provisioning Container, select Update Existing.
4.Click Select Container. The Locate Provisioning Container Keys dialog box opens.
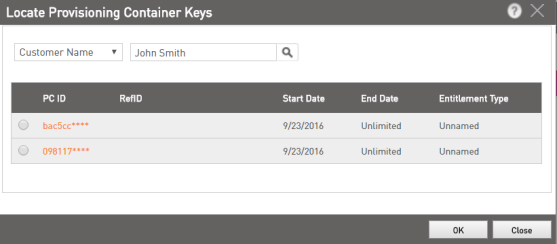
5.Search the Provisioning Container from the list by Customer Name or Provisioning Container ID. Select a Provisioning Container and click OK. In the Customer box, the associated Customer name is displayed.
6.To specify a Channel Partner, click the Add Channel Partner link. In the Channel Partner box that is displayed, specify a Channel Partner. Type the first few characters of the Channel Partner name. A list of matching names is populated. Select a name from the list. To perform an advanced search, click  .
.
If the Channel Partner has multiple contact e-mail IDs, you can choose one from the E-mail box.
7.(Optional) Click the Add Ref ID link to add reference IDs. In the Ref ID 1 and Ref ID 2 boxes that are displayed, enter information that identifies the Entitlement in another system, for example, the order code in your company's ERP system.
8.Click the Add Entitlement Notes link to add a description to the Product. The Comments box is displayed. Enter text to provide additional information about the Product (maximum 500 characters).
9.Modify Start Date and End Date for the Entitlement. To extend the end date indefinitely, select Unlimited.
10.The Deployment Mode, Entitlement Type, and Caching Type cannot be changed. Their values are inherited from the Provisioning Container.
11.If the Deployment Mode is On-premise and Caching Type is Entitlement Level, the following fields appear:
•Station Count: You can increase or decrease the Station Count (the maximum number of clients to which the Entitlement can be served).
•Max Registration Count: You can increase or decrease the Max Registration Count (the maximum number of machines that can be registered for the Entitlement). Select Unlimited to specify no limit.
•Allow Customers to Manage fingerprints and active stations:
•Fingerprints: Enables customers to manage fingerprints in the customer portal.
•Active Stations: Enables customers to manage active machines in the customer portal.
12.Do one of the following:
•To select the Products to be included in the Entitlement, on the Product Details pane click Add Product. The Product Selection dialog box opens.
•Or, click Yes in Do you want to configure Products? to add Products to the Entitlement.
13.Select one or more Products, and click Add Products to Entitlement. The selected Products are added to the Entitlement.
•If the license terms have been defined for all the Features in the Product, the details are not displayed. You can click  on the left of the Product to view the details.
•If the license term values for a Feature are not yet defined, all the Feature details for the Product are displayed. The License Terms for Features with values that need to be defined are shown in orange. After the values are defined, the License Terms are shown in green.
•Exclude or include Features that are not defined as always included.
| To exclude a Feature from the Product | Either select the Exclude check box or clear the Include check box, depending on the displayed settings. |
| To include a Feature in the Product | Either clear the Exclude check box or select the Include check box, depending on the displayed settings. |
14.For each Feature for which license term values have not been defined, an orange link appears in the License Terms column. Click this link to specify the required values for the Entitlement. After the values are defined, the License Terms are shown in green.
•For multiple Features that require the same licensing details, select the Features and click Configure to modify the Define License Terms for a Cloud Entitlement dialog box. For details, see Defining License Terms for a Cloud Product.
•For existing Products, you can modify the Execution Count, Time, and Grace Limit in the Configure License Terms dialog box.
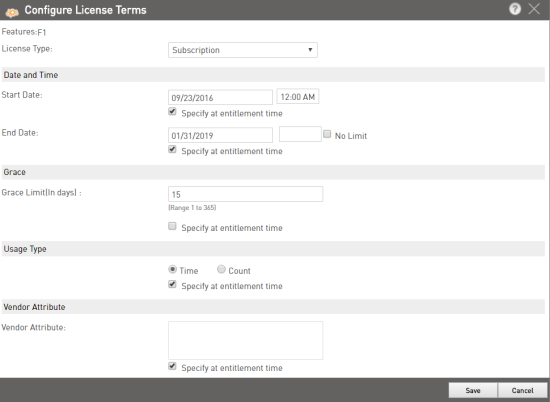
NOTE The Entitlement can be deployed only after the license term values have been defined for all the Features in all the Products included in the Entitlement.
15.Save as Draft or Deploy the Entitlement:
| To save the Entitlement in Draft state until it is ready to be deployed | Click Save as Draft. |
| To deploy to the Entitlement to the Sentinel Cloud Connect server | Click Deploy. |