Creating Dynamic Memory
The Create New Memory area enables you to define a new Dynamic Memory file and add it to the selected batch.
To create a dynamic memory file:
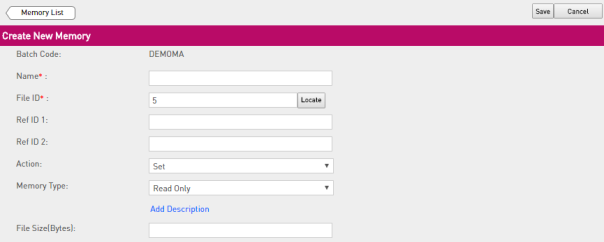
1.On the Dynamic Memory tab Click New Memory. The Create New Memory area is displayed.
2.In the Name field, enter a unique Dynamic Memory file name .
3.Enter the File ID. You can also click Locate to locate an existing File ID.
4.(Optional) To import data from an existing dynamic memory file, click Locate. The Locate Memory File dialog box opens.
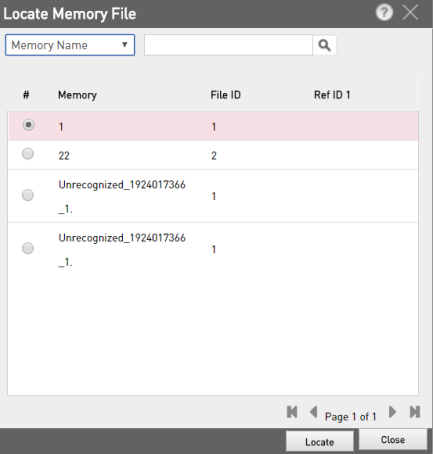
5.For the File ID that you want to use for importing data, select the corresponding file and click Locate.
NOTE The data contained in the file is copied into the corresponding fields and any existing data is overwritten. Memory segments (if any) are added under the Memory Segments tab. To save this file, you will be prompted to use a different file name.
6.Enter Ref ID 1 and Ref ID 2 if any.
7.In the Action list, select one of the following:
•Set: Adds the new data segment to the dynamic memory file. Existing information remains unchanged.
•Overwrite: The new data segment overwrites the existing information in the file.
•Cancel: Permanently deletes the dynamic memory file attached to the specified license.
8.In the Memory Type list, select one of the following:
•Read Only: Data to be read at run-time. For example, the Product version number, text to be used in a "Welcome" message, fixed threshold values for counters, and so on.
•Read/Write: Data that can be updated at run-time. For example, value variables for counters, information retrieved during interaction with the end user, and so on.
•Write Once: Data that can be updated only once at run-time and then is treated as Read Only.
9.Click Add Description to add description if any.
10.Enter the File Size (maximum 33600 bytes) for the Dynamic Memory.
The Memory Segments tab has the following options: New, Edit, Delete, Save, and Load.
![]()
11. If you prefer to use hexadecimal definitions instead of decimal definitions to define offset locations and addresses in memory, select the Hex addresses check box.
12.To define a new area in memory, click New. The New Memory Segment dialog box opens.
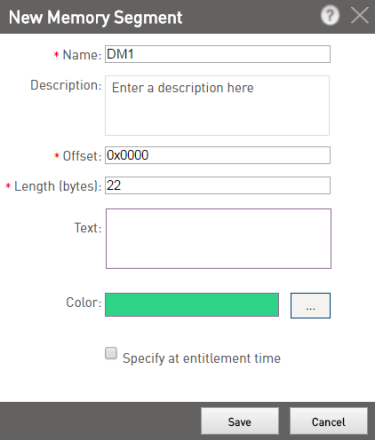
13. Enter a Name (maximum 50 characters; cannot contain the following special characters: < > & ”).
14.(Optional) Enter a Description (maximum 250 characters) for the new memory segment.
15. Enter the Offset and Length of the new segment. You can select a Color from the palettes that will help you identify the segment.
NOTE The field Length (bytes) accepts a value between 1 and 33600 only irrespective of the memory type selected.
16.(Optional) In the Text field, enter memory data for the new memory segment.
**WARNING** You must exercise caution while entering memory data in this field. Copying and pasting data from the Sentinel LDK Toolbox may lead to data modification during the copying process.
17.If you require the memory data for the New Memory Segment to be entered during Entitlement generation, select the Specify at Entitlement time check box.
NOTE When defining memory data for an Unlocked Product, you cannot specify that the data will be entered during Entitlement generation.
18. Click Save. The newly defined area is displayed in the lower section of the Memory tab. The segment addresses are displayed on the left.
To edit segments and data in memory:
> To edit the offset, size, or color of a memory segment, select the segment and click Edit. Make the required changes in the Edit Memory Segment dialog box and click Save to update the changes.
> To delete a memory segment, select the segment and click Delete. The segment is deleted.
> To save a memory segment as a XML file, select the segment and click Save. The File Download dialog box appears. Save the file to a directory in your system (default file name is dynamicMemory.xml).
>To load a memory segment from a file, click Load. The Load Memory File dialog box opens. Click Browse to navigate to the directory containing the saved memory segments, select the required memory segment, and click Load. The selected memory segment is loaded.
NOTE During Product definition, a loaded memory segment overwrites any pre-existing memory in that segment.