Checking in C2V File
Relevant for: Sentinel LDK Products and Entitlements
The Check in C2V dialog box enables you to process and store the Sentinel security key information that is contained in a Customer-to-Vendor (C2V) file. This information can be used in connection with Protection Key Update orders. In addition, it enables you to format a key. You can also generate a file that you can send to a customer to format a key that is already deployed.

NOTE If the C2V file contains dynamic memory data, the dynamic memory file is displayed with Base64 encoding in the Content column of the Dynamic Memory tab. To view this data, use a Base64 decoder.
You can do the following in the Check In C2V dialog box:
| Click... | To... |
|---|---|
| View Details | View the feature and memory details of a C2V file. |
|
Check In |
C2V file information such as C2V file name, Key ID, Batch Code, and Locking Type are checked into the EMS database. For details, see To check in a C2V file: |
|
Format |
Erase all license and memory data stored in the key and reset the data for that key in the EMS database. For details, see Formatting a Sentinel Protection Key. |
| Clear Clone |
>If the C2V file for a Sentinel SL key was sent from a cloned machine, the C2V file will not be checked in to the Sentinel EMS database, and the Clear Clone button becomes active. NOTE Sentinel EMS is designed to lock the licenses for C2V files containing the clone detection flag when they are checked in. When the license is locked, on the Check In C2V dialog box, the Clear Clone button is enabled. You need to use the Clear Clone functionality to unlock the license and check in the C2V file. This functionality is available for Sentinel SL Legacy keys, Sentinel SL-AdminMode, and Sentinel SL-UserMode keys. |
|
Clear Time Tamper |
Re-enable blocked applications by changing the V-Clock time. See Enabling Protected Applications Blocked Due to Time Tampering for details. |
|
Enable Key |
Enable the HL key that has been disabled due to tampering. See Enabling an HL Driverless Key Disabled Due to Tampering for more details. |
1.Select Entitlements > Check In C2V. The Check In C2V dialog box opens.
2.Click Browse and navigate to and select the C2V files you want to check in. Then click Open.
The C2V data is processed and the identification information of the keys is displayed, including the C2V file name, Key ID, Batch Code, and the locking type of the key. Also, the Check In button is enabled.
3.Select a C2V file and click Check In. Make sure to apply or remove any pending updates before checking in the C2V file. For details, see Removing/Applying Pending Updates.
Removing/Applying Pending Updates
You must remove or apply pending updates for a C2V file before you can apply new updates.
To remove or apply pending updates:
1.Select a C2V file and click Check In to display the number of pending updates.
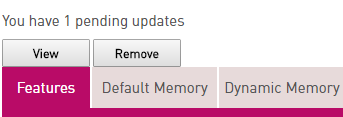
2.Do one of the following to handle pending updates:
•To remove all pending updates, click Remove.
•To apply pending updates:
i.Click View. The Pending Updates dialog box opens.
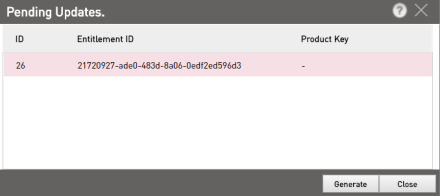
ii.Select the update and click Generate to generate the V2C file for the pending update.
Formatting a Sentinel Protection Key
Formatting a key erases all license and memory data stored in the key and resets the data for that key in the EMS database. You can format a key by:
>By formatting a locally connected Sentinel HL key.
>By creating an update file (V2C) for a Sentinel protection key that is already deployed in the field. The file can be sent to an end user to apply locally using the Sentinel Remote Update System (RUS).
**WARNING** Formatting a Sentinel protection key deletes all license data from the key.
When you receive a Sentinel HL key is received from a customer, you need to check in the information to make the data in the key available to Sentinel EMS.
To format a locally connected Sentinel HL key:
1.Click Entitlements > Check In Key.
2.Select the key and click Check In. The key is checked in and the Format button is enabled.
3.Click Format. A message appears, warning that all license data will be deleted from the key.
4.Click Yes to confirm and continue. The key is formatted and a success message is displayed.
To generate an update file (V2C) for formatting a remote Sentinel Protection Key:
1.Click Entitlements > Check In C2V.
2.Click Choose Files. The file Open dialog box appears.
3.Browse for the C2V file you wish to check-in, then click Open. The location of the C2V file is displayed and the Check In button is enabled.
4.Click Check In. The C2V file is checked in and the Format button is enabled.
5.Click Format. A message appears, warning that all Features will be deleted from the key and a Protection Key Update will be created to delete all license data from the remote key.
6.Click Yes to confirm and continue. The file download dialog box appears.
7.Save the V2C file. The default name for the file is displayed as FormatKey_[unique ID of key].v2c.
8.To complete the format operation, it is mandatory to apply the V2C file (Format V2C) generated in step 7. For details, see To apply Format V2C file to a Sentinel Protection Key at the end-user site:. If the Format V2C is not applied, EMS will not allow you to apply any subsequent updates made to the protection key.
If you are unable to access the Format V2C file (for any reason) and want to apply subsequent key updates, then the latest C2V for the protection key needs to be checked in before proceeding further. For details, see To apply license updates by regenerating Format V2C:.
To apply Format V2C file to a Sentinel Protection Key at the end-user site:
1.Navigate to and select the location where your RUS utility is stored.
2.Double-click rus.exe.
3.Click the Apply License Update tab. (This might be the only tab displayed.)
4.Click Browse to navigate to the V2C file containing the license update that you received.
5.Select the V2C file and click Open. The file name and path of the V2C file is displayed in the Update File field.
6.Click Apply Update to apply the new license data to your Sentinel Protection key.
To apply license updates by regenerating Format V2C:
If you are unable to access the previously generated Format V2C file (for any reason), then it needs to be re-generated. This is done by checking in the latest C2V for the key. If the Format V2C file is not applied, then subsequent updates made to the protection key also cannot be applied.
1.Apply the Format V2C file. For details, see Applying the Format V2C file.
2.Save the Format V2C file.
3.Click Format. The Format V2C file is re-generated.
4.Click Remove. The pending updates are deleted.
5.Check in the C2V received from the end user. Now, you can create and apply protection key updates.
Enabling Licenses That Were Disabled Due to Clone Detection
If the licenses for one or more applications that are locked to a Sentinel SL Legacy key are running on a cloned machine, those applications will be disabled; until the disabled licenses are cleared from the Sentinel SL Legacy key and new licenses are applied. This functionality has now been extended to include Sentinel SL-AdminMode and Sentinel SL-UserMode keys also.
To clear the disabled licenses, you can use the Clear Clone functionality during the Check in C2V process to generate a special V2C file.
NOTE Clearing a Sentinel SL Legacy key does not format the key.
To create a V2C file to clear a Sentinel SL key that has been disabled due to clone detection:
1.Select Entitlements > Check In C2V. The Check In C2V dialog box opens.
2.Click Choose Files. The file Open dialog box appears.
3.Browse for the folder where the C2V file is located. Select the C2V file and click Open.
4.Select the C2V and click Check In. If the C2V file has been sent from a cloned machine the Clear Clone button becomes active.
5.View the details of a C2V from a cloned machine by clicking View Details in the Check in C2V dialog box.
6.Click Clear Clone.
NOTE You will be able to generate the V2C onlyif the C2V is eligible for the Clear Clone operation. To learn more about C2V eligibility for the clear clone operation, see Eligible C2V for Clear Clone Operation. On the contrary, if you receive an error message, you will not be able to generate the V2C; see V2C Generation for Ineligible C2V.
7.Save the V2C file.
Synchronizing Protection Key with the Database
When the license information stored on the Sentinel protection key is updated outside of EMS, the Synchronize button is displayed when checking in the C2V file.
In this scenario, EMS is not aware of the changes made to the key, however, it can identify that the information stored on the C2V file is different from the current state of the database. Therefore, it prompts the user to synchronize the EMS database with updated license information on the C2V. Once the synchronization operation is performed, you will be able to check in the C2V file.
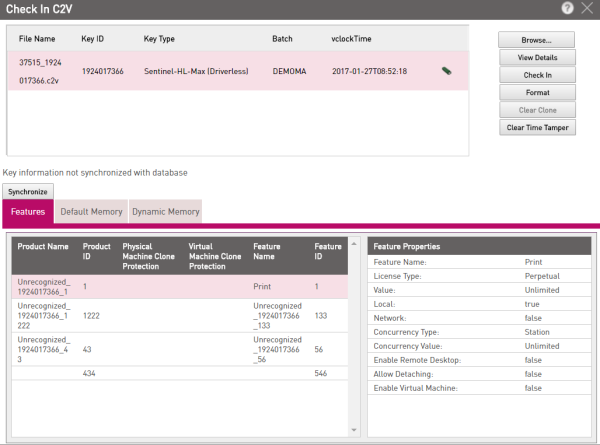
To synchronize the EMS database with the check in C2V:
1.Click the Browse button and select the updated C2V file. You must select the C2V file that was updated outside of EMS.
2.Click the Check In button. The Synchronize button appears and a message is displayed: 'Key information not synchronized with database'.
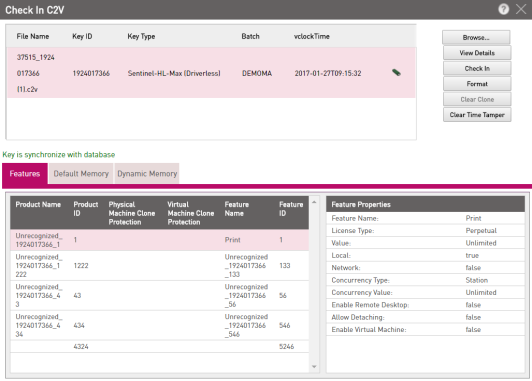
3.Click the Synchronize button. The Sentinel EMS database is updated and synchronized, and a success message is displayed. If you now try to check in the updated C2V file, the message displayed after Step 2 (see above) does not appear and the file is successfully checked in.
Eligible C2V for Clear Clone Operation
For a C2V to be considered eligible for the clear clone operation, at least one of the criteria in the clone protection scheme must match in both the reference and system fingerprints. If there is no match, an error message is displayed and the V2C cannot be generated.
>For a Product license that uses any of the standard Sentinel EMS clone protection schemes, the following eligibility criteria is used to determine whether the C2V is eligible for clear clone operation.
| Operating System | Physical Machine | Virtual Machine |
|---|---|---|
|
Windows |
Hard Disk UID or Motherboard UID or Secure Storage UID |
Ethernet UID or CPU or Motherboard UID or Secure Storage UID |
|
Linux |
Hard Disk UID or Motherboard UID or Secure Storage UID |
Ethernet UID or CPU or Motherboard UID or Secure Storage UID |
|
Macintosh (Mac) |
Hard Disk UID or Motherboard UID or Secure Storage UID |
Ethernet UID or CPU or Motherboard UID or Secure Storage UID |
|
Android |
CPU UID or Hard Disk UID or Android Serial Number or Secure Storage UID and Android First Boot |
Not Applicable |
>For a Product license that uses a custom clone protection scheme, at least one of the selected clone protection criteria must match in both the reference and system fingerprints.
V2C Generation for Ineligible C2V
After clicking the Clear Clone button, if you get an error message, it means that your C2V has failed to meet the minimum eligibility criteria for using the Clear Clone functionality. If you still want to allow the user to generate a V2C, you must do one of the following:
To generate a V2C file for an ineligible C2V—Method 1:
1.The end user must:
a.Delete all the V2C files on the machine.
b.Restart the LMS.
c.Using the RUS tool, generate the machine fingerprint.
d.Send the Fingerprint (C2V) to the ISV.
2.The ISV must:
a.Use the C2V to generate the license (V2C).
b.Pass the license (V2C) to the end user.
To generate a V2C file for an ineligible C2V—Method 2:
1.The end user must:
a.Delete all the V2C files on the machine.
b.Restart the LMS.
2.The ISV must:
a.Use the cloned C2V to generate a new license (V2C) using the Add Products from State option.
b.Pass the license (V2C) to the end user.
Enabling an HL Driverless Key Disabled Due to Tampering
The HL Driverless key that you are using can get disabled, if the system detects that someone has tried to tamper with it. Therefore, you must follow the steps on the GUI and enable the key so that you can use it again.
To enable an HL (Driverless) key:
1.On the EMS portal, navigate to Entitlements -> Check in C2V.
2.Click Browse.
3.Select the C2V file for the disabled key. You must provide the current state of the disabled HL key.
4.Click Open.
5.Click Enable Key.
6.Save the Key Enable V2C file downloaded (.v2cp format) on the user's machine. The V2CP file format was introduced in version 7.8. If there are any pending updates for the key, they will be bundled together and downloaded in V2CP format.
7.Using the RTE (version 7.63 or higher) installed on the user's machine, apply the .V2CP file.
Limitations
Sentinel EMS has few limitations when you use the key enablement functionality on the GUI. Let us examine them one by one.
>If Sentinel EMS has no information about a disabled key (neither used in EMS nor checked in before) and you try to enable it, then the operation cannot be completed. The system throws an error asking the user to re-enable the key using the license management system that was used to update the key.
>If there are changes made to the key outside EMS (example, via Licgen API or other EMS setup), then the disabled key cannot be re-enabled using EMS GUI. If you try to re-enable it, the system will throw an error asking the user to re-enable the key using the license management system that was used to update the key.